This is a documentation for Board Game Arena: play board games online !
Gamehelptekken: Difference between revisions
Khaki Baron (talk | contribs) No edit summary |
Khaki Baron (talk | contribs) No edit summary |
||
| Line 14: | Line 14: | ||
! | ! | ||
|- | |- | ||
|[[File: | |[[File:Image - 2025-08-07T122721.958.png|alt=Close Rage|thumb|Close Rage]] | ||
|'''Close Range''' – a situation on the Stage when two Characters’ Miniatures are placed on adjacent Spaces. | |'''Close Range''' – a situation on the Stage when two Characters’ Miniatures are placed on adjacent Spaces. | ||
Each Symbol that affects your opponent can be resolved only when your Characters’ Miniatures are in a Close Range. Otherwise, you just punch the air and nothing happens. Learn more about Symbols further in this rulebook. | Each Symbol that affects your opponent can be resolved only when your Characters’ Miniatures are in a Close Range. Otherwise, you just punch the air and nothing happens. Learn more about Symbols further in this rulebook. | ||
|- | |- | ||
|[[File: | |[[File:Image - 2025-08-07T122913.171.png|alt=Distance Example 1|thumb|235x235px|a) A straight line of hexes, the Distance in this example is 1 Space away.]][[File:Image - 2025-08-07T123405.220.png|alt=Distance Example 2|thumb|237x237px|b) Not a straight line of hexes, the Distance in this example is 1 Space away.]] | ||
|'''Distance''' – a situation on the Stage when two Characters’ Miniatures are NOT standing on adjacent Spaces. Whenever you would need to count Distance X Spaces away, X will be the number of Spaces between Miniatures in the shortest way. | |'''Distance''' – a situation on the Stage when two Characters’ Miniatures are NOT standing on adjacent Spaces. Whenever you would need to count Distance X Spaces away, X will be the number of Spaces between Miniatures in the shortest way. | ||
| Line 31: | Line 31: | ||
{| class="wikitable" | {| class="wikitable" | ||
|+ | |+ | ||
! | |||
! | |||
! | |||
! | ! | ||
! | ! | ||
|- | |- | ||
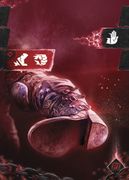
|[[File:Image | |[[File:Image (214) (1).png|alt=Attack Card Anatomy|thumb|Attack Card Anatomy]] | ||
|Each Attack Card includes: | |Each '''Attack Card''' includes: | ||
Deck Identification sign to make the preparation of your deck easier. | # '''An Attack Area''' – one of three lines, each one always contains the same set of Symbols – icons representing available actions (Find out more about each Symbol on p. XXX of this rulebook.): | ||
## High – Strike 2 (fist icon, deals 2 damage) | |||
## Mid – two Moves and Push (foot icon x2 and pushing hand, allows to move 1 Space twice and push opponent 1 Space), | |||
## Low – Move and Strike 1 (foot and fist icons, move 1 Space and deal 1 damage). | |||
# '''A color:''' Yellow and Green for punches with fists, Red and Blue for kicks with legs. Colors are used to make sequences of cards called Combos. For your convenience, each color is marked with its own sign.[[File:Image - 2025-08-06T155048.316.png|thumb|Cards Colors]] | |||
# '''Extensions''' – may provide additional Symbols in specific Attack Areas for subsequent cards. You’ll find 1 Extension on each Common Attack Card and 3 Extensions on Special Attack Cards. | |||
# '''Deck Identification''' sign to make the preparation of your deck easier. | |||
|[[File:TKN MS Common-Action-Cards FRONT 05.jpg|alt=Example of High Attack card|none|thumb|183x183px|Example of High Attack card]] | |||
|[[File:TKN MS Common-Action-Cards FRONT 01.jpg|alt=Example of Mid Attack card|none|thumb|190x190px|Example of Mid Attack card]] | |||
|[[File:TKN MS Common-Action-Cards FRONT 11.jpg|alt=Example of Low Attack card|none|thumb|181x181px|Example of Low Attack card]] | |||
|} | |} | ||
| Line 55: | Line 58: | ||
! | ! | ||
|- | |- | ||
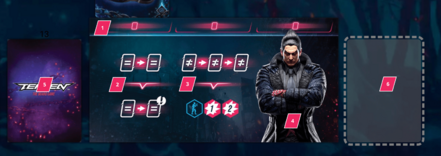
|[[File:Image - 2025-08- | |[[File:Image - 2025-08-07T130429.158-min.png|alt=Combo Board Anatomy|none|thumb|441x441px|Combo Board Anatomy]] | ||
| | | | ||
# Attack Slots | # Attack Slots | ||
# Combo 1 | # Combo 1 | ||
# Combo 2 | # Combo 2 | ||
# Character’s portrait | # Character’s portrait | ||
# Deck | # Deck | ||
# Discard (face-down). | # Discard (face-down). | ||
|} | |} | ||
| Line 114: | Line 117: | ||
=== Playing an Attack Card === | === Playing an Attack Card === | ||
[[File:AD 4nXclQlLiACL04qF1o0vXK5S70EoGXyZvATTH9sly2sz4DG2IzgqOlDDiRb tBu9-MnIs10rOalNl5JR2Dcx5weiUcJzq-B6xoMpOZ8NYXaQtpvrhUyyLtl-IinitxDMnpfnTZ69Isg.png|alt=Atack Slot|thumb|Atack Slot]] | [[File:AD 4nXclQlLiACL04qF1o0vXK5S70EoGXyZvATTH9sly2sz4DG2IzgqOlDDiRb tBu9-MnIs10rOalNl5JR2Dcx5weiUcJzq-B6xoMpOZ8NYXaQtpvrhUyyLtl-IinitxDMnpfnTZ69Isg.png|alt=Atack Slot|thumb|Atack Slot]] | ||
The Offensive player places 1 hidden (face-down) Attack Card to the first available Attack Slot on the Combo Board. Attack Slots are marked on the Combo Board | The Offensive player places 1 hidden (face-down) Attack Card to the first available Attack Slot on the Combo Board. Attack Slots are marked on the Combo Board, and the cards should be played above them, consequently from the leftmost to right. | ||
{| class="wikitable" | {| class="wikitable" | ||
|ATTENTION! | |ATTENTION! | ||
|- | |- | ||
|If the Offensive player has the Punishment Token on the Attack Slot, they play an Attack Card as Punishment in that slot face-up instead: it cannot be predicted and blocked. In this case, skip the Defender’s Punish Attempt step and proceed immediately to Resolving the Attack Card. [[File:AD 4nXdLTUV3E6Mj5YeXm4-65C2rd-cs4aa11E5x9CXdPTRcKKD8zCsEauV7m7RsTEMHJL-URBPjdrtTbi0CkQqyyAmxPkkBBo10if80ApYRNJg8GsO9eqQ78GmdO9dhxrs6Em7ntM7d1A.png|alt=Punishment Token|thumb|Punishment Token]] | |If the Offensive player has the Punishment Token on the Attack Slot, they play an Attack Card as Punishment in that slot face-up instead: it cannot be predicted and blocked. In this case, skip the Defender’s Punish Attempt step and proceed immediately to Resolving the Attack Card. [[File:AD 4nXdLTUV3E6Mj5YeXm4-65C2rd-cs4aa11E5x9CXdPTRcKKD8zCsEauV7m7RsTEMHJL-URBPjdrtTbi0CkQqyyAmxPkkBBo10if80ApYRNJg8GsO9eqQ78GmdO9dhxrs6Em7ntM7d1A.png|alt=Punishment Token|thumb|Punishment Token|left]]⚠️ '''NOTE:''' You can get the Punishment Token in a Successful Punish Attempt. Read on to learn more. | ||
|} | |} | ||
| Line 132: | Line 137: | ||
! | ! | ||
|- | |- | ||
| | |[[File:AD 4nXdvy-DuBURrJ-juHLWAg9TtVYDRt9HQbFG Bq9WQn 79 Ou6J t4qFXnKflMoSOiZAxntm3YT4OIOzhDV4wlltqLJoD8-hBMUy2I7WPU0u-jhxPFbUIfO5tFeMuCaMoHpns7Vt-.png|alt=cards available in the Common deck|thumb|cards available in the Common deck|left]]While guessing, try to analyze the situation on the Stage. You can find cards available in the Common deck on the VS tile and Character Special Attack Cards on their Character Cards. Try to track which cards your opponent played, which Extensions they have on the previous Attack Card, pay attention to their available Combos on the Combo Board, and look at your Characters Miniatures positions on the Stage to know what your opponent would like to play. | ||
| | | | ||
|} | |} | ||
| Line 152: | Line 157: | ||
|Move your Character’s Miniature to an adjacent free Space (not onto Walls or the other Miniature). | |Move your Character’s Miniature to an adjacent free Space (not onto Walls or the other Miniature). | ||
{| class="wikitable" | {| class="wikitable" | ||
| | |⚠️ '''NOTE:''' | ||
Each Move Symbol allows you to Move by 1 Space. | Each Move Symbol allows you to Move by 1 Space. | ||
| Line 158: | Line 163: | ||
| | | | ||
|- | |- | ||
|[[File: | |[[File:Image - 2025-08-07T131845.685.png|alt=Strike symbol|thumb|94x94px|Strike symbol (Deal 1 damage)]][[File:Image - 2025-08-07T131953.916.png|alt=Strike symbol 2|thumb|141x141px|Strike symbol 2 (Deal 2 damage)]] | ||
|STRIKE | |STRIKE | ||
|Deal X damage (opponent loses X HP). Mark the received damage by moving the HP marker on the HP bar by X Spaces towards the centre. | |Deal X damage (opponent loses X HP). Mark the received damage by moving the HP marker on the HP bar by X Spaces towards the centre. | ||
{| class="wikitable" | {| class="wikitable" | ||
| | |⚠️ '''NOTE:''' | ||
A Strike Symbol without a number means Deal 1 damage. | A Strike Symbol without a number means Deal 1 damage. | ||
| Line 170: | Line 175: | ||
| | | | ||
|- | |- | ||
| | |[[File:Image - 2025-08-07T132225.953.png|alt=Push|thumb|99x99px|Push]] | ||
|PUSH | |PUSH | ||
|While in Close Range, Push your opponent away X Spaces from your Character in a straight line. If there is a Wall on the way, instead of moving further, they hit the Wall and take damage, depending on the Wall type: | |While in Close Range, Push your opponent away X Spaces from your Character in a straight line. If there is a Wall on the way, instead of moving further, they hit the Wall and take damage, depending on the Wall type: | ||
| Line 179: | Line 184: | ||
You’ll find additional information about the Stage-specific Wall types on the Stage Help Sheets. | You’ll find additional information about the Stage-specific Wall types on the Stage Help Sheets. | ||
{| class="wikitable" | {| class="wikitable" | ||
| | |⚠️ '''NOTE:''' | ||
A Push Symbol without a number always means Push by 1 Space. | A Push Symbol without a number always means Push by 1 Space. | ||
| Line 185: | Line 190: | ||
| | | | ||
|- | |- | ||
| | |[[File:AD 4nXe wzJ4cj-WcZ82adMzi8Fn lEZOTLwrUO8tXukS6 Ex9sH6UKJT2yYhUxZRQvTsXmRxPpiEHME7u4KoU6fa06dYUbSaI3Xod0x0YfICza6FcWhAaaNSDh9BDstm1BSMJSmuhHETg (1).png|alt=Sweep|thumb|99x99px|Sweep]] | ||
|SWEEP | |SWEEP | ||
|Knock down the adjacent opponent’s Miniature (lay it on its side on the current Space). While knocked down, they lose 1 additional HP for each Strike (count Strike Symbols, not damage dealt) received until their next String. At the beginning of their String, the Character gets up. | |Knock down the adjacent opponent’s Miniature (lay it on its side on the current Space). While knocked down, they lose 1 additional HP for each Strike (count Strike Symbols, not damage dealt) received until their next String. At the beginning of their String, the Character gets up. | ||
{| class="wikitable" | {| class="wikitable" | ||
| | |⚠️ '''NOTE:''' | ||
Knocked Down Characters can be Pushed as usual. | Knocked Down Characters can be Pushed as usual. | ||
| Line 195: | Line 200: | ||
| | | | ||
|- | |- | ||
| | |[[File:AD 4nXfomSHgLjE8p0tWdbHIiZyc47WY qRadD9kmzcmuG7WFoQpyxqPV yPx0UqSgPMkMOnZ6qjZchUH4dFtE-jEab-Q5J6uR95SziwUZuLabzKskqfWlUKCRnhVPgkkZxf5EI7XTsX-Q (1).png|alt=Stun|thumb|106x106px|Stun]] | ||
|STUN | |STUN | ||
|Stun the opponent by placing a Stun Card in their next available Attack Slot above their Character’s Combo Board. | |Stun the opponent by placing a Stun Card in their next available Attack Slot above their Character’s Combo Board. | ||
A player cannot play an Attack Card to a slot marked with the Stun card; therefore plays 1 Attack Card less for each Stun card during the next String. Return Stun Cards to the supply after that String. | A player cannot play an Attack Card to a slot marked with the Stun card; therefore plays 1 Attack Card less for each Stun card during the next String. Return Stun Cards to the supply after that String. | ||
{| class="wikitable" | {| class="wikitable" | ||
| | |⚠️ '''NOTE:''' | ||
Do not consider the Stun card as a played Attack Card. | Do not consider the Stun card as a played Attack Card. | ||
| Line 206: | Line 211: | ||
| | | | ||
|} | |} | ||
⚠️ | ⚠️ '''NOTE:''' Every Symbol in the game that affects an opponent only works when the opponent is in a Close Range (unless explicitly stated otherwise). That means your Characters’ Miniatures are standing on adjacent Spaces on the Stage. | ||
==== Available Attack Types ==== | ==== Available Attack Types ==== | ||
| Line 226: | Line 231: | ||
===== Attack Card ===== | ===== Attack Card ===== | ||
{| class="wikitable" | {| class="wikitable" | ||
|[ | |[[File:AD 4nXeqgDprvFWaoyNlLhwio34ZzbLPf7YObC0BrON-27AZgb6jqomr9XpGqAxZgn9i4EoGnt61cXVypYa0MuOovIDHzZctPi0nNKfKwVHHm4OQ09WChS AYqUXLq5E6hLCmi9LZ2xs.png|alt=Extension|thumb|Extension]] | ||
|Extensions grant additional Symbols in specific Attack Areas for subsequent Attack Cards. Extension Symbols are located on the right side of each Attack Card. You can apply their effect if the Extension Symbol on a previous Attack Card in a String matches the Attack Area on the card that is being resolved. If they do match, they form a Connected Extension. | |Extensions grant additional Symbols in specific Attack Areas for subsequent Attack Cards. Extension Symbols are located on the right side of each Attack Card. You can apply their effect if the Extension Symbol on a previous Attack Card in a String matches the Attack Area on the card that is being resolved. If they do match, they form a Connected Extension. | ||
|} | |} | ||
| Line 233: | Line 238: | ||
|Extension not connected (no additional effect). | |Extension not connected (no additional effect). | ||
|- | |- | ||
|[[File:AD 4nXcyl-6fde6AJc6tjKKZ9QgOqVJxXg4r0QoQelAb0q-BYSqKS SaRfZSQYbC1heo ZxjeEVHJJTeSC9ci5wUvCABI8dwbJJgONA6eqYhY3vATs2W2omYgwJvYmNBS-b5DLqtW5YiVQ.png|alt=Connected Extension (apply the effect).|thumb|Connected Extension (apply the effect).]] | |[[File:AD 4nXcyl-6fde6AJc6tjKKZ9QgOqVJxXg4r0QoQelAb0q-BYSqKS SaRfZSQYbC1heo ZxjeEVHJJTeSC9ci5wUvCABI8dwbJJgONA6eqYhY3vATs2W2omYgwJvYmNBS-b5DLqtW5YiVQ.png|alt=Connected Extension (apply the effect).|thumb|Connected Extension (apply the effect).|center]] | ||
|[[File:Disconected.png|alt=Extension not connected (no additional effect).|thumb|Extension not connected (no additional effect).]] | |[[File:Disconected.png|alt=Extension not connected (no additional effect).|thumb|Extension not connected (no additional effect).|center]] | ||
|} | |} | ||
⚠️ | ⚠️ '''NOTE:''' Special Attack Cards have 3 Extension Symbols (one for each Attack Area), while Common Attack Cards have only 1. So if you’ve played a Special Attack Card in the first Attack Slot, that means that any card played on the next slot will create the Connected Extension. | ||
===== Combo ===== | ===== Combo ===== | ||
| Line 245: | Line 250: | ||
!COMBO STRUCTURE: | !COMBO STRUCTURE: | ||
|- | |- | ||
|[ | |[[File:Image - 2025-08-07T133025.358.png|alt=Combo|thumb|Combo]] | ||
|'''1. Requirement''' | |'''1. Requirement''' | ||
Combo effect triggers each time the player fulfills the requirement presented in the upper part of the Combo (above the --v-- sign). Usually, it specifies the order and color of Attack Cards to be played in one String. | Combo effect triggers each time the player fulfills the requirement presented in the upper part of the Combo (above the --v-- sign). Usually, it specifies the order and color of Attack Cards to be played in one String. | ||
'''2. Effect''' | '''2. Effect''' | ||
| Line 258: | Line 263: | ||
!COMBO REQUIREMENTS EXAMPLES | !COMBO REQUIREMENTS EXAMPLES | ||
|- | |- | ||
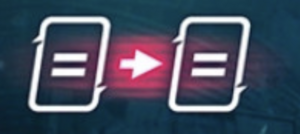
| | |[[File:Image - 2025-08-07T133313.560.png|thumb]] | ||
| | |||
|An Attack Card in a specified color played after any Card in one String. | |An Attack Card in a specified color played after any Card in one String. | ||
|- | |- | ||
| | |[[File:Image - 2025-08-07T133231.372csczs.png|thumb]] | ||
|The Attack Card just played matches the color of the Attack Card in the previous Attack Slot. | |The Attack Card just played matches the color of the Attack Card in the previous Attack Slot. | ||
|- | |- | ||
| | |[[File:Image - 2025-08-07T133229.699.png|thumb]] | ||
|3 cards played one after another in one String, each in a different color. | |3 cards played one after another in one String, each in a different color. | ||
|} | |} | ||
⚠️ | ⚠️ '''NOTE:''' Sometimes you may trigger more than one Combo at the same moment. In this case, resolve the effects of both Combos separately. | ||
===== Rage ===== | ===== Rage ===== | ||
| Line 299: | Line 301: | ||
Jin decides not to use the second Move Symbol from the Attack Card and ends his attack. | Jin decides not to use the second Move Symbol from the Attack Card and ends his attack. | ||
|- | |- | ||
|[ | |[[File:Image - 2025-08-07T133552.869-min 2.png|center|thumb|782x782px]] | ||
|} | |} | ||
Each Character has their own unique set of components. The components and the Symbols on them introduce unique mechanics specific to that Character. | Each Character has their own unique set of components. The components and the Symbols on them introduce unique mechanics specific to that Character. | ||
| Line 310: | Line 312: | ||
!How to read schemes: | !How to read schemes: | ||
|- | |- | ||
| | |[[File:Adada.png|thumb]] | ||
|Your Character’s Miniature on a Space on the Stage | |Your Character’s Miniature on a Space on the Stage | ||
|- | |- | ||
| | |[[File:AD 4nXfYaDjMnCf3l7AaGNlPQhjRxx91vh4ZxobJEbvLjkHB26r7B6AXJcEP-QkUOA99QKh8I-gYNnBM86k-ahfCqT3lEmg9wjwrqC3dPjzAZq6bNbAIFU6Pr2FjaLfXjwE1-nKYTwcC7w.png|thumb]] | ||
|The opponent’s Character Miniature on a Space on the Stage | |The opponent’s Character Miniature on a Space on the Stage | ||
|- | |- | ||
| | |[[File:AD 4nXdL2CIfleiXPs1wLlkVtF-9a64jXejpcuSoIT7kDkRje7mcRnUiqpueVqClTAUIA07a0OWrT8zyEbA1OTeYPtAK50P-t4vJiEkN7WsF7dUiXoev4mBVwrI2K4PVk pSl2u8VtUEEg.png|thumb|75x75px]] | ||
|Empty Space on the Stage, where you would need to move your Character’s Miniature. | |Empty Space on the Stage, where you would need to move your Character’s Miniature. | ||
|- | |- | ||
| | |[[File:AD 4nXdxfposSe5blqxl4 tEVwDlLCX8D3qTjQlKycHej0JqB5MHk6nj8dVIswv4FocVnNIkNUO0yXzF14-UvbjuIY R4J4BrJZLgxWSdDzg7rINna-yk4bJO2lcKxKwIxdrSOKJKa6O.png|thumb]] | ||
|A Space between you and the opponent. | |A Space between you and the opponent. | ||
|- | |- | ||
| | |[[File:AD 4nXembrPv7a0oAJl8llp8y3ESNFaPOpvqDhTEWz7qdMbIMvFtaHqf8MYpKXdXs1tX2eEJB4pUaioabqHX2dYM9UqvjSIuqV3WJNT 5piVEpmMLqM1CQTkjYme41lQaBFH 5k6KCjbGA.png|thumb]] | ||
|Spaces where the opponent should stand on to receive the indicated damage, depending on the positions on the Stage. | |Spaces where the opponent should stand on to receive the indicated damage, depending on the positions on the Stage. | ||
Note: This is not a Strike Symbol. | Note: This is not a Strike Symbol. | ||
|- | |- | ||
| | |[[File:AD 4nXdTyzUBTIEBpDkH vFTYDEVyRfpVyFIZyggW7WzA6QPgH2DnMYNR0kNEL6XbhM94-VYpoXb82zpdTyoWr9hlIJAMeJ3PBIVw-ZoFU2DB2PQ1xVnaEYhgy3HTFxuRMfFN1N 0fFw.png|thumb]] | ||
|Any distance in a straight line between Characters’ Miniatures, including Close Range. | |Any distance in a straight line between Characters’ Miniatures, including Close Range. | ||
|- | |- | ||
| | |[[File:AD 4nXc72LPWCPkkOLR9 L4YJCZvcnLaoiqzFbK-CUVE5IvznxejrV80zbjGwC7fMMvAA-7l9eGgkZtOjhCEQc3raXCbHamRO2twDhB7qd796XzmqxhVIenWhS1dDpl64v-7eDss41jM2w.png|thumb]] | ||
|Blue arrow: Direction in which you have to move your Character’s Miniature in a straight line. | |Blue arrow: Direction in which you have to move your Character’s Miniature in a straight line. | ||
Resolve all special Spaces on the way. | Resolve all special Spaces on the way. | ||
|- | |- | ||
| | |[[File:AD 4nXeNz7a0Z Jd7zYTPHL5D TFRp7j257CP-l0xvNpKFdsuIO6ueqmceHlSH0tflvQV09kzbdwTgH7 SdxbJ71spY5jPlUSD-xa3-5DG-gC47GaDfKiw9-Y7P4tUMji71nJCIkuq9o7A.png|thumb]] | ||
|Red arrow: Direction in which the opponent’s Character Miniature must be moved. | |||
Resolve all special Spaces on the way. | |||
|- | |||
|[[File:AD 4nXeQ5s5WiVq9jd-AhxBKt1WU1b5PUeMbiI5l75Wyl3AEdGk7Rlm5bfvaeyw22OIH2vkQHSSA0Fvdt-SrmnK2forPbORRG1pkt-F6XftIrcyFnAbp8MP--meE7Q5kl4htUzidEeB5Kg (1).png|thumb|136x136px]] | |||
|Dotted arrow: move a Character’s Miniature to any of the indicated Spaces. Do not resolve special Spaces on the way. | |Dotted arrow: move a Character’s Miniature to any of the indicated Spaces. Do not resolve special Spaces on the way. | ||
|- | |- | ||
| | |[[File:AD 4nXet3IA6s208BoUJ9iFobatnwr6BPwLY6vGAknrdZwdznlnkp1Sttelq000PLOBtk051dJPg5d1Il7L4eZZDnGRcBEWhHfSUQBBaHlkCowwQCM3Xe5oRcMSQxT-ItsPLcIydz2e8PA.png|thumb]] | ||
|Push the opponent by X Spaces. Unlike the basic Push Symbol (pushing hand), this one can be resolved while in Distance. | |Push the opponent by X Spaces. Unlike the basic Push Symbol (pushing hand), this one can be resolved while in Distance. | ||
|} | |} | ||
=== | === Refilling Attack Cards in Hand === | ||
The Offensive player draws as many Attack Cards from their deck as needed to restore the hand to 3 cards. If you need to draw a card and your deck is empty, shuffle your discard pile to form a new deck. If an Event Card is drawn, immediately reveal it and trigger its effect, then discard it to the discard pile. | |||
==== Events ==== | |||
Each Stage contains Event Effects. During the setup, players shuffle up to 2 Event Cards into their Attack Cards decks (depending on Stage special rules). | |||
{| class="wikitable" | |||
|+ | |||
! | |||
!⚠️ ATTENTION! | |||
|- | |||
|[[File:AD 4nXcJroIHEiPBo-nTIPiIJLXfP30i2WKIpKF01R72NVpoVIptk6XJLwABidR8Nv-EZUGuJpw78eD 9K-fwR fCs5h9ZgGzYH91wtcKV4YeDgTUO0DOOeqEApT-dSQutQjwcCuV9ZmxQ.png|alt=Event Card|thumb|Event Card]] | |||
|There is no way to have an Event Card in your hand. Whenever drawn, it immediately triggers its Effect, depending on the chosen Stage, and goes to the discard pile. Draw another card to refill your hand to 3 Attack Cards. | |||
|} | |||
=== Determining the Next Offensive Player === | |||
The Offensive player continues the String (remains the Offensive player) and proceeds to Playing an Attack Card step if at least one Attack Slot remains available and either of the following is true: | |||
* The Punish Attempt was unsuccessful (the last Attack Card was not blocked). | |||
* The player has activated Heat during the current turn (regardless of whether the last Attack Card was blocked). | |||
Otherwise, the players are switching roles. In that case, all cards placed on the Offensive player's Attack Slots should be discarded (move Attack Cards to their discard pile and Stun Cards back to the supply). Knocked down Characters stand up. | |||
Then the Offensive player’s String is over, and they become the Defender for the next String. | |||
⚠️ '''NOTE:''' The discard pile should be hidden, preventing the opponent from seeing the cards in it. During the Round, players cannot look through the cards in their decks or discard piles. | |||
== Heat == | |||
Each player begins the Round with a charged Heat Token. Once per Round, before playing an Attack Card player may decide to activate the Heat Token. | |||
Heat Activation: | |||
* The Offensive player gains an additional fourth Attack Slot (mark it by placing the Heat Token on the right side of the Combo Board), and their String does not end if the Defender blocks an Attack Card (effectively guaranteeing the possibility to play 4 Attack Cards in this String). | |||
** If the Attack Card is blocked while Heat is activated, the attacking player discards the played card to the discard pile and places a Stun card in that Attack Slot. Attacks are interrupted, but the String is continued. | |||
* The Defender does not gain the Punishment Token after a successful Punish Attempt. | |||
After activation, turn the Heat Token to the discharged side. It can’t be used again during this Round. | |||
{| class="wikitable" | |||
! | |||
!⚠️ ATTENTION! | |||
|- | |||
|[IMG] | |||
|The Offensive player can also activate their Heat Token after resolving their 3rd Attack Card, to make a slot for the 4th card. | |||
|} | |||
{| class="wikitable" | |||
! | |||
!EXAMPLE | |||
|- | |||
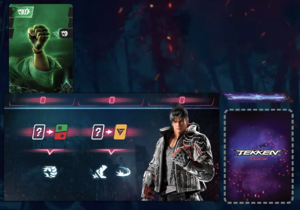
|[[File:Image - 2025-08-07T140700.186.png|alt=Heat Activation|thumb|Heat Activation]] | |||
|Jin decided to activate Heat before playing the second Attack Card in the String. | |||
|- | |||
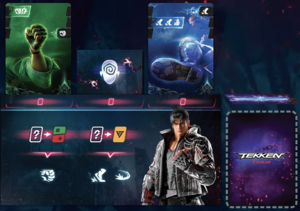
|[[File:Image - 2025-08-07T140702.357.png|thumb|Successful Punish Attempt]] | |||
|Jin played the Attack Card face-down in the second Attack Slot. Kazuya guessed the Attack Area correctly, so his Punish Attempt was successful. | |||
|- | |||
|[[File:Image - 2025-08-07T140704.546.png|thumb|Stun card on the second Attack Slot ]] | |||
|The attack is blocked, however, Jin does not end his String, because he has active Heat. Jin discards the Attack Card and places the Stun card on the second Attack Slot instead. | |||
|- | |||
|[[File:Image - 2025-08-07T140706.739.png|thumb|Jin continues the String ]] | |||
|Jin continues the String and plays the third Attack Card. Kazuya’s Punish Attempt is unsuccessful, so Jin resolves the Attack Card. Even though it is yellow, Jin’s Combo 2 cannot be triggered, as the Stun card in the previous Attack Slot cannot be used to fulfill Combo requirements. | |||
|- | |||
|[[File:Image - 2025-08-07T140708.749.png|thumb|Jin plays the 4th Attack Card ]] | |||
|Jin plays the 4th Attack Card above the Heat token. Kazuya’s Punish Attempt is unsuccessful, so Jin triggers Combo 1, dealing 1 damage with Strike, resolves Attack Card along with Connected Extension, and ends his String. | |||
|} | |||
== End Of The Round == | |||
The Round ends immediately when at least one Character is Knocked Out – their HP is reduced to 0. The winner of the Round is the Character with any remaining HP. In case of a tie, both players are considered winners. | |||
Revision as of 13:16, 7 August 2025
TEKKEN – The Board Game: Rulebook
Goal of the Game
Defeat your opponent by reducing their HP (Health Points) to zero, thus winning the Round. By default you win the game when you win three rounds.
__________________________________________________________________
Key definitions
Possible positions
| Close Range – a situation on the Stage when two Characters’ Miniatures are placed on adjacent Spaces.
Each Symbol that affects your opponent can be resolved only when your Characters’ Miniatures are in a Close Range. Otherwise, you just punch the air and nothing happens. Learn more about Symbols further in this rulebook. | |
Distance – a situation on the Stage when two Characters’ Miniatures are NOT standing on adjacent Spaces. Whenever you would need to count Distance X Spaces away, X will be the number of Spaces between Miniatures in the shortest way.
| |
Attack Card Anatomy
Each Attack Card includes:
|
Combo Board Anatomy
|
Gameplay Overview
In TEKKEN – The Board Game, one Round is the act of playing until a single Health Bar is depleted.
Each Round consists of alternating turns called Strings – which include the flow of actions (Attack Cards, Combos, etc.) performed by the active player.
During the game, players switch between two roles:
- The active player, the one who is building the String at the moment, is the Offensive player.
- The other one who’s trying to interrupt the String and regain the initiative by foreseeing the Offensive player’s Attacks is the Defender. This process of guessing is called the Punish Attempt.
The Offensive player chooses an Attack Card and plays it face-down in the first Attack Slot. The Defender guesses which type of Attack Card is played and declares one of the three Attack Areas. Then the card is revealed. If successful – the Attack is interrupted and the Defender gains initiative, placing the Punishment token in the first available Attack Slot, guaranteeing one unblockable attack. Otherwise, the Offensive player resolves the Attack Card and the additional effects it triggers.
Turn Structure: The String
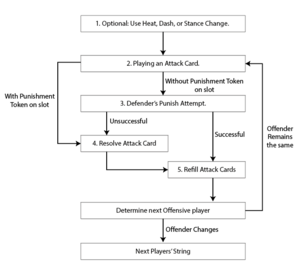
The String involves one or more Attacks by the Offensive player, broken down into these steps:
| The Attack Steps |
|---|
|
TURN STEPS EXPLANATION
Before playing an Attack Card (optional)
There are several possibilities to make your situation on the Stage slightly better. That’s not obligatory to do, but feel free to use them to prepare to fight.
Stance Change – If the Offensive player has 3 Attack Cards of the same color or 3 Attack Cards with the same Attack Area in the hand before playing a card, they may reveal their hand to the opponent and then discard these cards to their discard pile face-down and draw 3 new Attack Cards from their deck.
Dash – If the Distance is more than 1 Space between Characters, they may perform a Dash. Shorten the Distance to 1 Space between Characters’ Miniatures by moving the Offensive player’s Miniature as many Spaces as needed in the shortest possible way.
Note: If you need to enter any special Spaces on the way, apply the effect.
Heat – Once per Round, you may activate the Heat Token to gain an extra Attack Slot in the String. During that String, you will not lose initiative even if the Defender guessed the Attack Area correctly and blocked your Attack. Learn more on p. XX of this rulebook.
Playing an Attack Card
The Offensive player places 1 hidden (face-down) Attack Card to the first available Attack Slot on the Combo Board. Attack Slots are marked on the Combo Board, and the cards should be played above them, consequently from the leftmost to right.
| ATTENTION! |
| If the Offensive player has the Punishment Token on the Attack Slot, they play an Attack Card as Punishment in that slot face-up instead: it cannot be predicted and blocked. In this case, skip the Defender’s Punish Attempt step and proceed immediately to Resolving the Attack Card. ⚠️ NOTE: You can get the Punishment Token in a Successful Punish Attempt. Read on to learn more. |
Defender’s Punish Attempt
The Defender is trying to anticipate which type of Attack Card the Offensive player chose to play and declares one of the three Attack Areas (High, Mid, or Low). Then the Offensive player reveals the Attack Card.
Unsuccessful Punish Attempt: If the declared Attack Area does not match the Attack Area on the played card. The Attack is not blocked. The Offensive player proceeds to Resolving the Attack Card step.
Successful Punish Attempt: If the declared Attack Area matches the Attack Area on the played card. The Attack is blocked, the String is interrupted, and ends immediately. The Defender gains the Punishment Token and places it on their first available Attack Slot. The Offensive player discards all the cards from their Attack Slots to the discard pile face-down. Proceed directly to Refilling Attack Cards in Hand step and switch the roles (Exception: Heat, p. XX).
| Pro-tip: | |
|---|---|
| While guessing, try to analyze the situation on the Stage. You can find cards available in the Common deck on the VS tile and Character Special Attack Cards on their Character Cards. Try to track which cards your opponent played, which Extensions they have on the previous Attack Card, pay attention to their available Combos on the Combo Board, and look at your Characters Miniatures positions on the Stage to know what your opponent would like to play. |
Resolving the Attack Card
The revealed Attack Card contains a set of Symbols to be resolved and can trigger Combo and/or Rage if the player decides so.
| MOVE
|
Move your Character’s Miniature to an adjacent free Space (not onto Walls or the other Miniature).
|
||||
| STRIKE | Deal X damage (opponent loses X HP). Mark the received damage by moving the HP marker on the HP bar by X Spaces towards the centre.
|
||||
| PUSH | While in Close Range, Push your opponent away X Spaces from your Character in a straight line. If there is a Wall on the way, instead of moving further, they hit the Wall and take damage, depending on the Wall type:
1 damage for Regular Walls , 2 damage for Blasting Walls . You’ll find additional information about the Stage-specific Wall types on the Stage Help Sheets.
|
||||
| SWEEP | Knock down the adjacent opponent’s Miniature (lay it on its side on the current Space). While knocked down, they lose 1 additional HP for each Strike (count Strike Symbols, not damage dealt) received until their next String. At the beginning of their String, the Character gets up.
|
||||
| STUN | Stun the opponent by placing a Stun Card in their next available Attack Slot above their Character’s Combo Board.
A player cannot play an Attack Card to a slot marked with the Stun card; therefore plays 1 Attack Card less for each Stun card during the next String. Return Stun Cards to the supply after that String.
|
⚠️ NOTE: Every Symbol in the game that affects an opponent only works when the opponent is in a Close Range (unless explicitly stated otherwise). That means your Characters’ Miniatures are standing on adjacent Spaces on the Stage.
Available Attack Types
There are three possible Attack Types that could be activated in your string:
| Attack Card | Combo | Rage |
|---|---|---|
| The Symbols from an Attack Card itself and a Symbol from Extension, if it’s Connected (see below). | The Symbols from a Character’s Combo Board, if the condition is met (you’ve played at least two cards in one String in certain colors). | The Symbols from a Rage card become available to use when your HP is in the red zone. |
You may choose which Attack Type to resolve first, and the Symbols within each Attack Type may be resolved in any order. However, if you started resolving Symbols from a specific Attack Type (e.g. Combo), you cannot intermix them with Symbols from another Attack Type (e.g. Rage).
Anytime you may skip resolving one or more Symbols played by you (i.e. you don’t have to Move anywhere, if you like your position on the Stage).
Attack Card
| Extensions grant additional Symbols in specific Attack Areas for subsequent Attack Cards. Extension Symbols are located on the right side of each Attack Card. You can apply their effect if the Extension Symbol on a previous Attack Card in a String matches the Attack Area on the card that is being resolved. If they do match, they form a Connected Extension. |
| Connected Extension (apply the effect). | Extension not connected (no additional effect). |
⚠️ NOTE: Special Attack Cards have 3 Extension Symbols (one for each Attack Area), while Common Attack Cards have only 1. So if you’ve played a Special Attack Card in the first Attack Slot, that means that any card played on the next slot will create the Connected Extension.
Combo
The Offensive player may trigger an effect from the Character’s Combo Board if a just-played Attack Card fulfills the requirements.
| COMBO STRUCTURE: | |
|---|---|
| 1. Requirement
Combo effect triggers each time the player fulfills the requirement presented in the upper part of the Combo (above the --v-- sign). Usually, it specifies the order and color of Attack Cards to be played in one String. 2. Effect Symbols that can be resolved if the Combo is triggered. Players may resolve Symbols from the Combo effect in any order or skip them if needed. You need to finish resolving Combo before switching to resolving any other Attack Types (i.e. the Attack Card or Rage Card). |
| COMBO REQUIREMENTS EXAMPLES | |
|---|---|
| An Attack Card in a specified color played after any Card in one String. | |
| The Attack Card just played matches the color of the Attack Card in the previous Attack Slot. | |
| 3 cards played one after another in one String, each in a different color. |
⚠️ NOTE: Sometimes you may trigger more than one Combo at the same moment. In this case, resolve the effects of both Combos separately.
Rage
There are two Rage Cards available for each Character. Players secretly choose one of them at the beginning of the Round. The chosen Rage Card is revealed and becomes available when the Character's HP drops to 6 or fewer (reaches the red section of the HP bar). From now on, the player may activate the effect of the Rage during their String. It can be resolved as one of the Attack Types when resolving the Attack. After activation, discard the Rage Card to the gamebox, it can’t be used again during this Round.
| Some Rage Cards contain extra requirements like an exact position on the Stage or specific Attack Cards played to activate. If a player activates a Rage Card and meets its requirements, resolve the Symbols available on the Rage Card the same way as Combo Symbols. |
Available Attack Types Sumary
| REMINDER! |
|---|
| Symbols from different Attack Types, such as Attack Card, Combo, and Rage, cannot be mixed! Note that the Extension Symbol is a part of the Attack Card effect.
Example: It’s the second Jin’s attack in the String. He has a blue Attack Card with Extension in the Mid Attack Area on the first Attack Slot. 1. Jin played a Mid Area yellow Attack Card, and Kazuya’s Punish Attempt failed. 2. Jin decides to resolve his Combo first and performs Move and Sweep. 3. Jin starts to resolve his Attack Card. He sees the opportunity to push Kazuya onto the Stun Space. To do so, Jin performs a Move to stand in a straight line with Kazuya and Stun Space. 4. Jin uses a Strike Symbol from Connected Extension to deal 2 damage (+1 for the opponent being knocked down) before he Pushes the opponent away. Kazuya receives a Stun card and places it above the first available Attack Slot. Jin decides not to use the second Move Symbol from the Attack Card and ends his attack. |
Each Character has their own unique set of components. The components and the Symbols on them introduce unique mechanics specific to that Character.
You may find more detailed information about each Character’s Combos and Rage on the Characters’ Help Sheets.
| How to read schemes: | |
|---|---|
| Your Character’s Miniature on a Space on the Stage | |
| The opponent’s Character Miniature on a Space on the Stage | |
| Empty Space on the Stage, where you would need to move your Character’s Miniature. | |
| A Space between you and the opponent. | |
| Spaces where the opponent should stand on to receive the indicated damage, depending on the positions on the Stage.
Note: This is not a Strike Symbol. | |
| Any distance in a straight line between Characters’ Miniatures, including Close Range. | |
| Blue arrow: Direction in which you have to move your Character’s Miniature in a straight line.
Resolve all special Spaces on the way. | |
| Red arrow: Direction in which the opponent’s Character Miniature must be moved.
Resolve all special Spaces on the way. | |
| Dotted arrow: move a Character’s Miniature to any of the indicated Spaces. Do not resolve special Spaces on the way. | |
| Push the opponent by X Spaces. Unlike the basic Push Symbol (pushing hand), this one can be resolved while in Distance. |
Refilling Attack Cards in Hand
The Offensive player draws as many Attack Cards from their deck as needed to restore the hand to 3 cards. If you need to draw a card and your deck is empty, shuffle your discard pile to form a new deck. If an Event Card is drawn, immediately reveal it and trigger its effect, then discard it to the discard pile.
Events
Each Stage contains Event Effects. During the setup, players shuffle up to 2 Event Cards into their Attack Cards decks (depending on Stage special rules).
| ⚠️ ATTENTION! | |
|---|---|
| There is no way to have an Event Card in your hand. Whenever drawn, it immediately triggers its Effect, depending on the chosen Stage, and goes to the discard pile. Draw another card to refill your hand to 3 Attack Cards. |
Determining the Next Offensive Player
The Offensive player continues the String (remains the Offensive player) and proceeds to Playing an Attack Card step if at least one Attack Slot remains available and either of the following is true:
- The Punish Attempt was unsuccessful (the last Attack Card was not blocked).
- The player has activated Heat during the current turn (regardless of whether the last Attack Card was blocked).
Otherwise, the players are switching roles. In that case, all cards placed on the Offensive player's Attack Slots should be discarded (move Attack Cards to their discard pile and Stun Cards back to the supply). Knocked down Characters stand up.
Then the Offensive player’s String is over, and they become the Defender for the next String.
⚠️ NOTE: The discard pile should be hidden, preventing the opponent from seeing the cards in it. During the Round, players cannot look through the cards in their decks or discard piles.
Heat
Each player begins the Round with a charged Heat Token. Once per Round, before playing an Attack Card player may decide to activate the Heat Token.
Heat Activation:
- The Offensive player gains an additional fourth Attack Slot (mark it by placing the Heat Token on the right side of the Combo Board), and their String does not end if the Defender blocks an Attack Card (effectively guaranteeing the possibility to play 4 Attack Cards in this String).
- If the Attack Card is blocked while Heat is activated, the attacking player discards the played card to the discard pile and places a Stun card in that Attack Slot. Attacks are interrupted, but the String is continued.
- The Defender does not gain the Punishment Token after a successful Punish Attempt.
After activation, turn the Heat Token to the discharged side. It can’t be used again during this Round.
| ⚠️ ATTENTION! | |
|---|---|
| [IMG] | The Offensive player can also activate their Heat Token after resolving their 3rd Attack Card, to make a slot for the 4th card. |
| EXAMPLE | |
|---|---|
| Jin decided to activate Heat before playing the second Attack Card in the String. | |
| Jin played the Attack Card face-down in the second Attack Slot. Kazuya guessed the Attack Area correctly, so his Punish Attempt was successful. | |
| The attack is blocked, however, Jin does not end his String, because he has active Heat. Jin discards the Attack Card and places the Stun card on the second Attack Slot instead. | |
| Jin continues the String and plays the third Attack Card. Kazuya’s Punish Attempt is unsuccessful, so Jin resolves the Attack Card. Even though it is yellow, Jin’s Combo 2 cannot be triggered, as the Stun card in the previous Attack Slot cannot be used to fulfill Combo requirements. | |
| Jin plays the 4th Attack Card above the Heat token. Kazuya’s Punish Attempt is unsuccessful, so Jin triggers Combo 1, dealing 1 damage with Strike, resolves Attack Card along with Connected Extension, and ends his String. |
End Of The Round
The Round ends immediately when at least one Character is Knocked Out – their HP is reduced to 0. The winner of the Round is the Character with any remaining HP. In case of a tie, both players are considered winners.


