This is a documentation for Board Game Arena: play board games online !
Tips oust
Overview
Oust can be a tricky game to get used to at first. The goal is to capture all your opponent's pieces, but initially there's no clear way to do this, since you can't capture or grow your own groups without your opponent's help in a sense.
Here's a brief overview of some strategic ideas and then if you wish you can read further in a dedicated section below:
- Try to place your stones in a way that gives you more free moves than your opponent. A free move is a move that either can't be captured by your opponent, or if captured gives them little to no gain in the game.
- Restrict the opponent's available moves. You don't always have to capture every stone and group of your opponent right away. If your group is strictly larger than a nearby group it could capture 2 beside 1, 3 beside 2 or 1 and so on, then you may be able to safely leave the opponent's dead stones on the board until later.
- You can sacrifice some stones in the beginning of the game to make the opponent's stones inefficient, that is they don't use the space around them effectively.
- Having too many more groups than your opponent can lose you the game.
- Allowing your opponent to have too large a group can lose you the game. It can be difficult, if not impossible to capture a group of about 20 stones on size 7 for instance.
- Having only small groups next to opponents larger groups can put you at a large disadvantage.
- Look out for the N+2 rule in order to take advantage of tactics, i.e. if you have a group two sizes larger than the opponents nearby groups, there may be some tactics to take advantage of. See below for examples of tactics (trapping, lead in captures, attachments).
- Some shapes are more efficient to merge groups later, but can be vulnerable to chain capturing. Be aware of this tradeoff!
Further sections detailing the above to be created and updated soon.
Tactics
This section will try to give examples of short term tactics in Oust, such as chain captures, lead-in captures, trapping and attachments.
One term that might be useful to define and use could be the effective size of a group. This would be the potential size a group can become through captures that are available or will become available after an attachment. Keeping track of effective sizes of groups could be useful in determining which moves to play.
Attachments
Typically when you play directly beside an opponents stone or group, attaching/touching to that stone or group, you immediately make it stronger. Usually the opponent can choose a direction to grow their group after the attachment. This will likely become unavoidable at some stages of the game. However there are some cases where attaching has its advantages:
Trapping
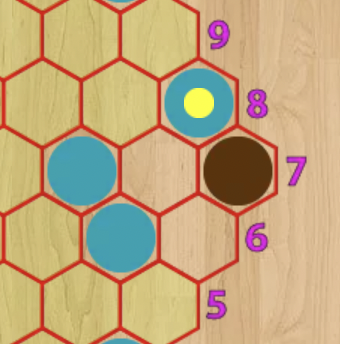
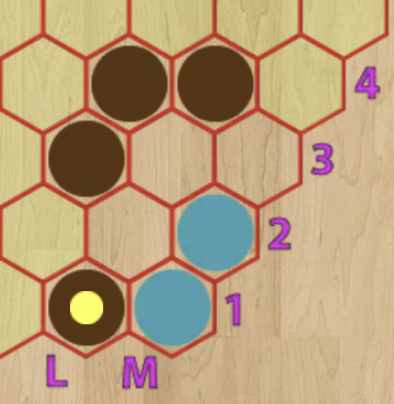
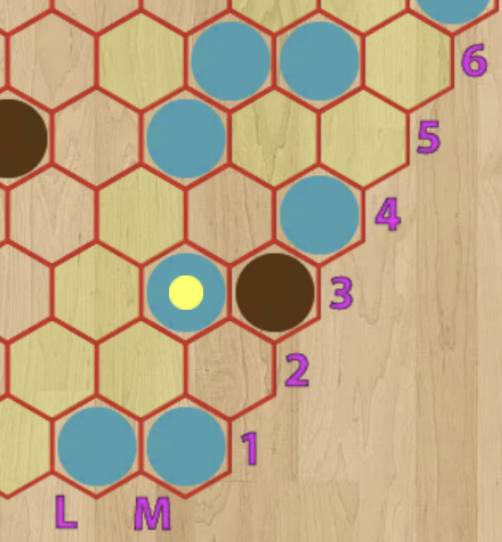
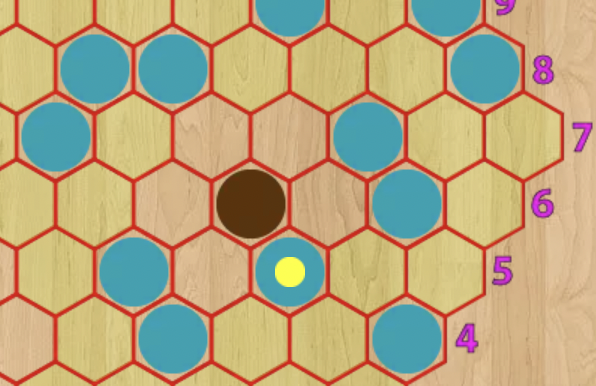
The tactic of trapping, is a particular type of attachment move, taking advantage of the rule for capturing placements, whereby you need to be larger than the opponents group you touch in order to capture it. We can think of this as an example of a free move mentioned above. Typically with these trapping moves you attach a single stone to your opponents single stone or group, in a situation where the opponent can only grow in directions where they would touch a group of the same size or larger. In these cases the opponent can't capture and it's like the group is trapped with no legal growing/capturing placements. The following images show some examples of trapping moves:
1) The easiest place to trap an opponents group is typically in corners, since there is already a limited number of directions to grow with capturing placements. Here a two stone group and an attachment traps the single brown stone.
2) An example of a three stone group and an attachment trapping two blue stones in the corner.
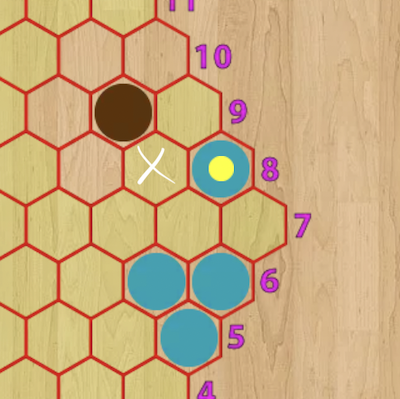
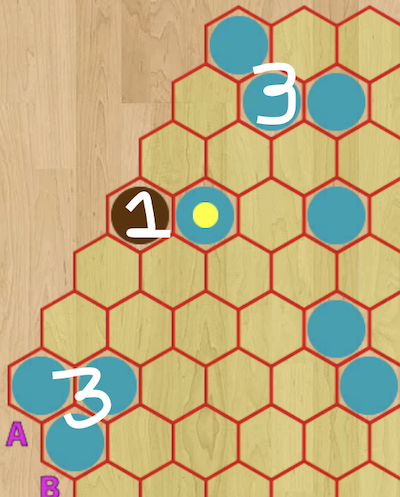
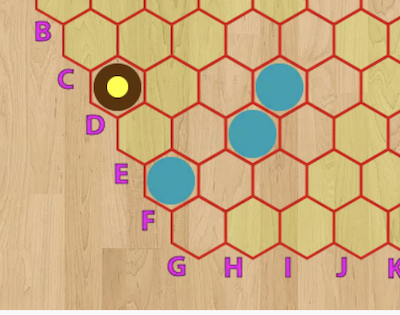
3) Trapping a single brown stone on the side of the board. It could only potentially grow in directions that touched two and three stone groups meaning it was trapped by the attachment.
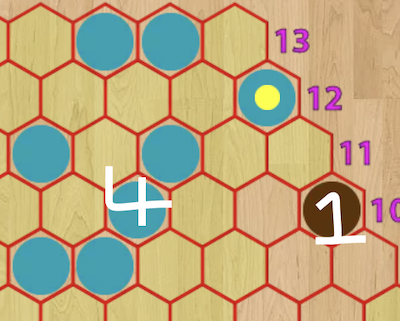
4) Here the single brown stone could only grow into size two and three groups after the attachment, and so was trapped by the attachment, this time in the centre of the board.
Follow-up capture
Another way to use an attachment, is to create a kind of follow-up capture threat. This could either be to directly join the attachment stone back to a larger group which causes a capture, and in some cases this can potentially bring out of range groups in range of captures. Some examples of this type of follow-up capture are given below.
In the example above, blue has attached to the two brown stones, and is threatening to join back to their nearby single stone, creating a group of size 3, which will capture the two brown stones. This case is also similar to the lead-in capture (see section below) where brown has no safe direction to capture this stone without running too close to a larger group.
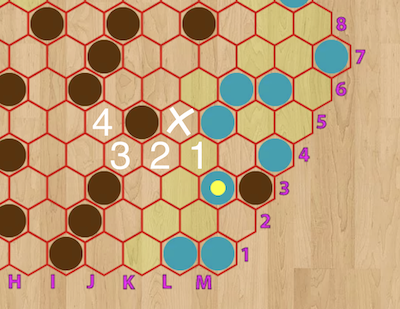
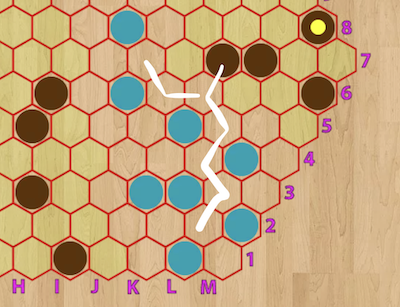
In the second example above, which comes from the trapping example 3, with this attachment, blue is also threatening follow-up captures. Without this attachment blue could only play at the X to capture the single stone. However after this attachment, blue can instead play the sequence 1,2,3,4 to capture all the brown groups adjacent, which is an example of chain-capturing (see next section).
Chain Captures
When making a capturing placement in Oust you must take another move. This can sometimes be a good thing and other times a bad thing, depending on whether you want to be the player making a move. However it does lead to the technique of chain captures, that is, multiple captures in a row in a single turn, which can be useful throughout the game and especially with good choice of timing. A simple example of chain capturing is show below.
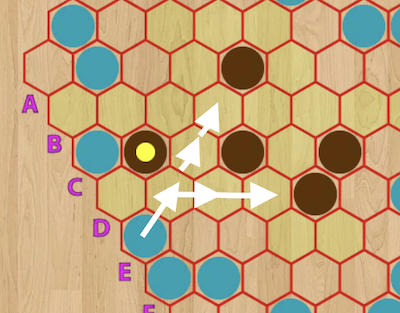
Brown has attached to a Blue piece, and this has opened up two paths for Blue to chain capture the Brown groups. Blue can choose to go Northeast and then East twice to capture three groups including the side two group, or they can choose to go Northeast three times and capture the three singleton groups shown.
One might say then that in this example that the 3 stone group has an effective size of 6, since it can become a group of size 6 when necessary. This could be useful to note when choosing which moves and sacrifices to make.
Lead in Captures
This is another way to play free moves, and a way to either delay playing detrimental moves yourself, or potentially a way to capture stones and possibly end games. The move below is an example of a lead-in capture. Blue plays a single stone in capturing range of the brown stone. However if Brown captures at the X spot, then they move in capturing range of the larger size 3 blue group, and so they have been led into a capture by a capture. If Brown doesn't capture they can be captured next by Blue. This can be a useful way to force the opponent to decide to give up on stones or be forced to capture stones.
In the above case Brown could capture eastward and avoid a recapture, however in special cases that might not be an option like in the example below, Brown has no good options after the lead in capture move shown.
N+2 Rule
Now that some examples of tactics have been looked at, for capturing groups or generating free moves, and forcing the opponent to make another move, we can consider when is it likely for tactics to arise in a game?
User manaT coined the term "N+2 rule" for Oust as a kind of heuristic on when to expect and look for tactics in Oust. Except in some special cases like the trapping tactics shown above, typically one wants to have a friendly group that is two sizes larger than neighbouring enemy groups, in order for some of the tactical ideas above to work. That is one might want a friendly size 3 or larger group near size 1 (singleton) enemy groups, size 4 beside enemy size 2 groups or smaller and so on.
In the previous sections, one could see lead in captures and follow-up captures working when surrounding groups were at least two sizes larger, or much larger than the enemy group. Here are some more examples of buying time with placements and attachments, forcing the opponent to play another move, using the N+2 heuristic:
In the above, blue has a size 4 group and so can play the lead in capture move against the size 1 group. Below, Blue has two nearby size 3 groups, and so can play the attachment to the size 1 group, threatening a follow-up capture.
Too many groups can lose
This isn't a heuristic that always applies, as can be seen in some of the previous sections and equally you by definition have to have more groups than the opponent when you win. However what it should do is caution you to time your captures, and control when you make them, and how many more groups you create than the opponent.
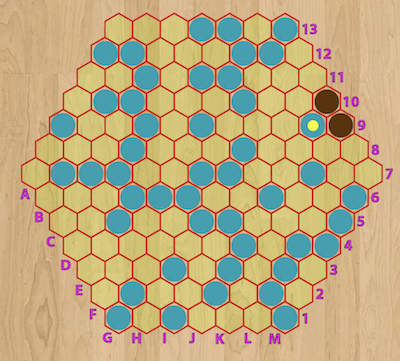
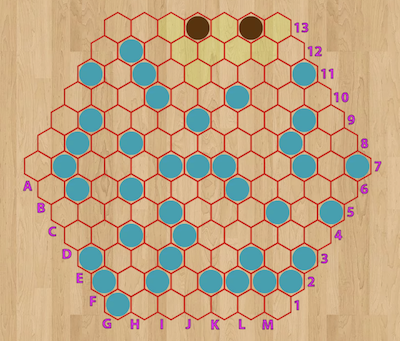
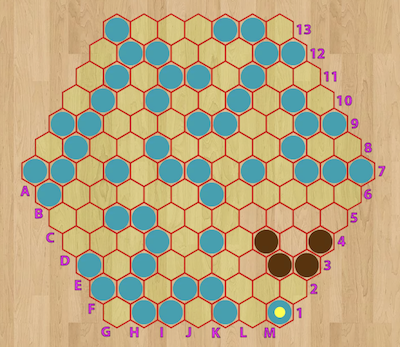
For example, below, here's a position where the game should be completely lost for blue with good play from brown. Blue got into this position by capturing at almost every opportunity and didn't create many chances for tactics, or to force their opponent to play enough bad moves.
The reason this position is losing for blue may not be completely obvious, but essentially, blue has run out of free moves, and their groups are very scattered and overall not very large (largest is size 6). Blue has no choice but to play either an attachment or at E11, which will allow brown either to start chain captures or to slowly grow and join their singletons into a larger and larger group, eventually recapturing all of blue's groups. Brown is now in control of the flow of the rest of the game.
Game Phases and Efficiency
It's not strictly defined that the game has certain phases, but while playing it seems that some distinct enough gameplay emerges to merit calling these different phases of the game.
Opening
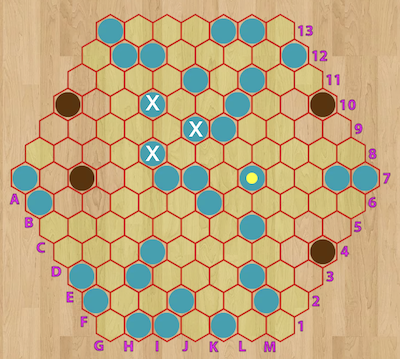
It seems reasonable to say the game is in the opening phase when there is still open space to play in where players can place new pieces that can't be immediately captured or put under threat. Players are not forced to sacrifice pieces in this phase, though they might choose to, depending on the strategy followed.
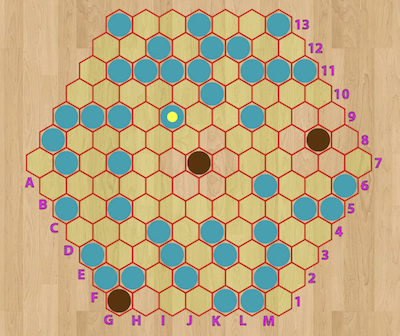
Above is the example of a game of Oust in the opening phase; there is plenty of room to place a new piece without it being under threat of capture. This phase can be played in a few different ways. One can try the strategy mentioned previously, to force the opponent to make too many groups in the hopes they capture inefficiently and eventually run out of good moves. Alternatively one can try to create efficient formations of pieces, while trying to render the opponents pieces inefficiently placed. See a later section for a discussion of some ideas of efficiency.
Middlegame
There comes a point in many games of Oust where one or both players will not be able to play any new pieces that can't immediately be captured, and so players might be forced to sacrifice one or more groups they created in the opening phase.
An example of what might be called the middlegame of Oust is shown above. No new pieces can be played on the board that can't be captured, or captures are needed in order to free up space for new moves. This phase involves a lot of the tactics mentioned earlier to try to force the opponent to make more bad moves than you have to.
Endgame
Typically this might be described as a phase where players are finishing up the game, where one player has an advantage and is slowly (or rapidly) capturing their opponents groups, or it could be a close race where both players are trying to build the largest group before one is forced to be sacrificed. Some examples of this phase are shown below:
Above, blue has many groups, while brown has just one, and depending on the balance of moves and the relative sizes of groups one player will come out on top.
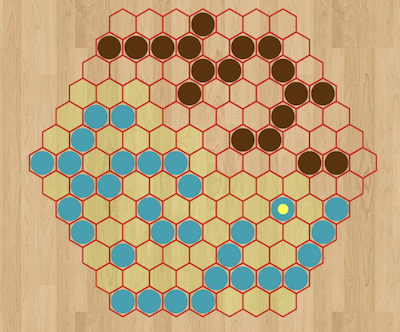
Above, both players are in a close battle to make the larger group, before one inevitably has to be sacrificed when that player runs out safe moves.
Efficiency
It's not exactly easy to describe what efficiency should mean in Oust, and it is likely to change as the game is played and studied more and more, particularly efficiency in the openings. However here are a few ideas that might help you to select relatively good moves in different phases of the game.
Efficiency in the opening is tricky to define and might be subject to change, potentially even dependent on board sizes, 6,7, 8 on BGA at present. However it should somehow take into account the idea that making many separate, in particular, small groups can ultimately lead to a loss. So it stands to reason, that should you have many stones on the board, if they are densely packed, they are reasonably efficient when it comes to quickly making larger groups. That is compare the example in the section called "Too many groups can lose" to the following example:
Here while blue has many groups, the groups are much more densely packed. The marked three stones form what is called the Wheel Shape or Wheel Template in the game of Hex, and in Oust, it's possible that these three stones can be connected in one move. Playing in the centre of the wheel would be one way to stop this, but even still, these kinds of shapes mean that two stones can become a group of size 3 quickly, or three stones a size four group in a single move.
However it's worth knowing that this dense packing can be a double edged sword particularly in the opening. In the example below, blue has densely packed pieces together but either a mistake or a loss of control on the game can lead to these pieces getting chain captured all at once, which is worth keeping in mind.
It's possible then that in the opening some intermediate between densely packed groups, and spaced groups provides a balance between flexibility to sacrifice and efficiency to combine.
Blocking efficient shapes
It's possible that you may want to play somewhere which forces the opponent to capture, before they can make some efficient shapes or surround some space. For instance one might see players play a move like brown does below, which 1) threatens to chain capture both blue groups and 2) prevents one wheel shape for blue.
Whether this kind of move is a gain or loss is hard to tell. It's certainly a type of move that gets played a lot, and it doesn't necessarily change the effective size of the group. That is, with a wheel consisting of two singletons and a size two group, they can become a size 5 group after a single attachment. On the other hand, if one has two neighbouring size two groups, again they can become a size 5 group after one attachment.
One other way of considering this, is that brown is taking away a movement space for blue (in the wheel spot) at the cost of increasing the size of a singleton. So the real differences will show up in the tactics that play out later in the game, whether a singleton could grow to a size 2 group, or a size 2 to a size 3 group at some moment could be an important point as to who controls the flow and who is forced to sacrifice going into the middle game.
Equally it could be possible that one of the singletons in the wheel could be sacrificed without losing the adjacent groups to a chain capture, while the two size groups might both be lost together in a single chain capture.
Slow capturing
In the middle and endgame it will turn out in many instances to slowly capture singletons and groups in order to maximise the number of moves the opponent has to play where they sacrifice groups and stones. Each sacrifice should be an opportunity to grow or join your own groups, and employing some of the tactics mentioned should help you to delay captures or create larger groups when capturing quickly.
Equally it might be considered good technique in endgame to capture groups around the edges before capturing into the centre, as you may have more space for tactics and attachments there, while growing your group(s) and capturing the opponent's groups.
Reserving Space
One more idea, which is something that needs more exploration, is the idea of reserving space for yourself on the board. What this might mean is surrounding an empty point or points whereby it would be much worse for your opponent to play there while it is a move you can freely play. In this case you would reserve playing here until you really need to, and other preferred moves have all been played.
This is a bit difficult to define, because your opponent will likely always be able to play in this reserved spot, but in the examples below, you will hopefully see that it will cost the player a lot to play in order to play in these "reserved" spaces.
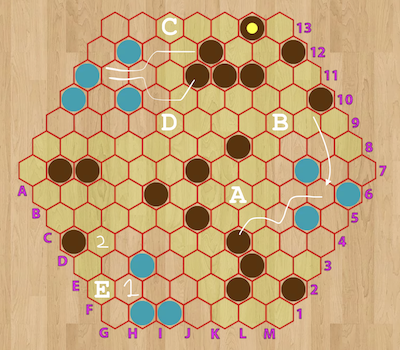
In this game, it might be reasonable to say that brown has reserved the spaces at A, B, C and D , because blue will not want to play here unless they plan to lose or sacrifice many of their stones. Some of the lines drawn show the possible chain captures should blue play any of A through D. In contrast a point like E, is one neither player really wants to play, should brown play E the stone on D4 can be chain captured or blue can consider the 1,2 combo. If blue plays E, the two blue groups in the corner are dead.
There's a few more points one might consider reserved for brown should you want to continue to examine this position.
